A skill is not "just a prompt"

I keep butting heads with my boyfriend about the usefulness of skills
In his opinion, skills are nothing more than prompts that tell AI what to do. What's the point of going through the trouble of creating your own skill, when you can simply prompt AI and get the same result?
My answer: this post.
In my opinion, skills are great. You define a workflow, an expertise, a process etc. only once and can call it whenever you need it without having to explain yourself all over again. How cool is that?
So to prove my point, I will guide you through the steps of creating a notification email HTML skill in the new Copilot Studio authoring experience that produces professional, modern, styled, copy-paste-ready email HTML code that you can simply paste into your Power Automate Send Email action for when you need to send out automated emails that look good every time. And in the process, I will give you my take on why taking the time to build skills is worth it and beats re-prompting your AI for the same output every time.
The anatomy of a skill
Before we start creating our Copilot Studio skill, let's look at what a skill is and how it is structured.
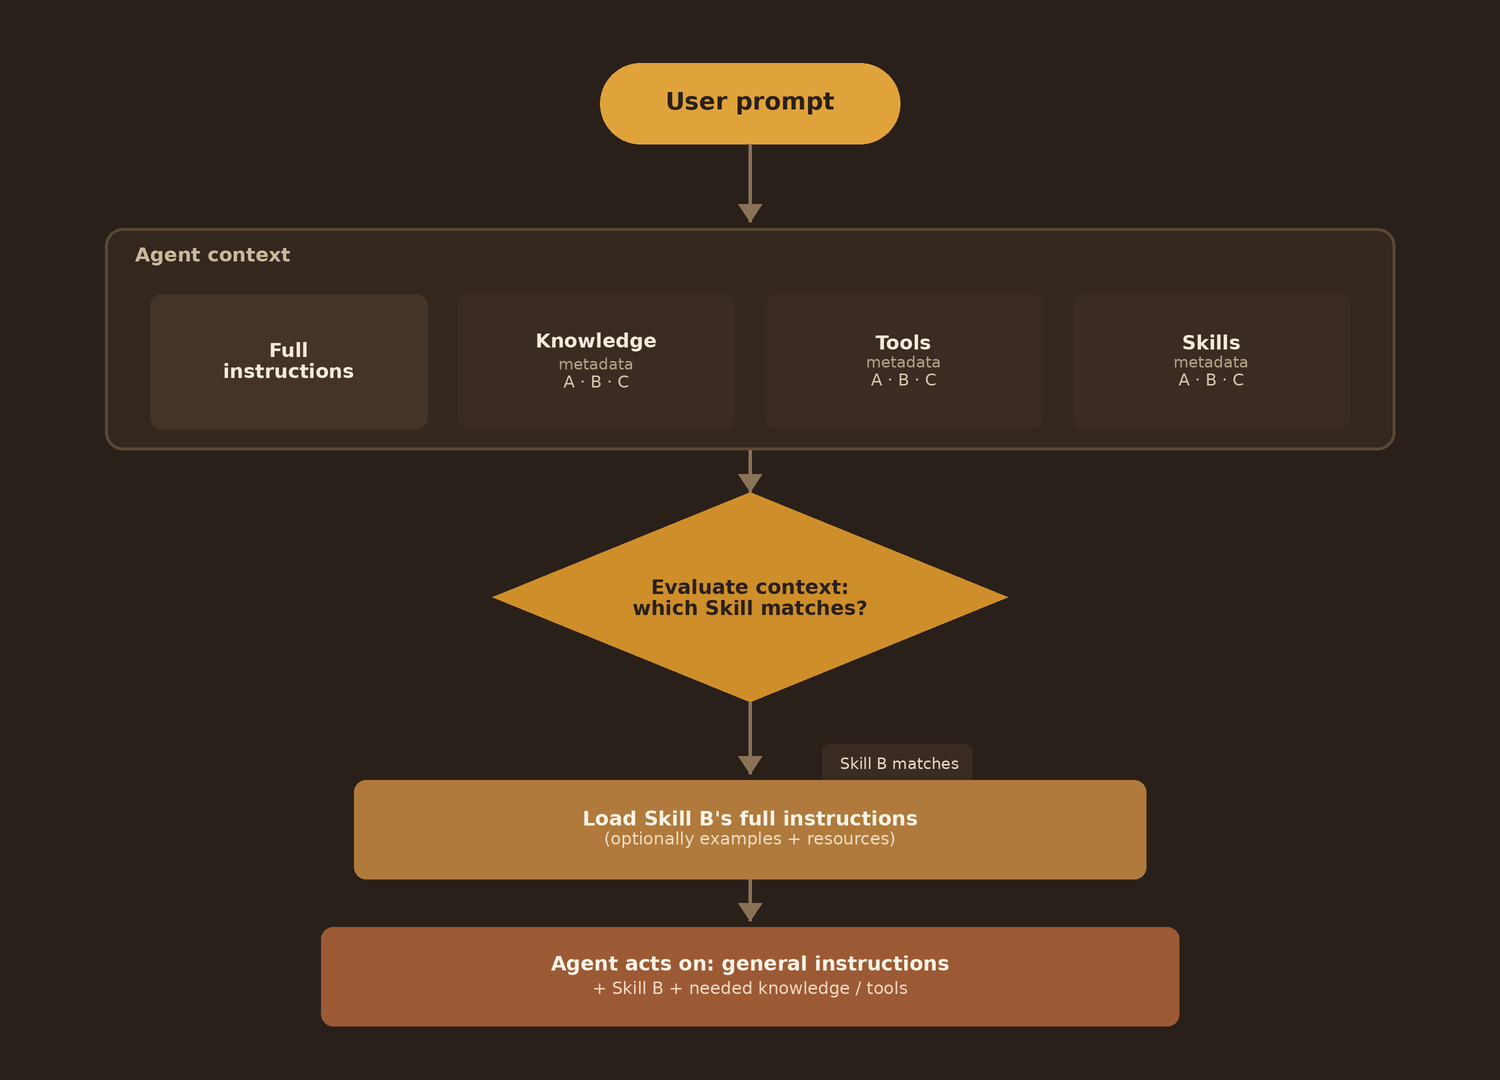
Skills in the new Copilot Studio authoring experience are based on the Agent Skills open format, an open standard originally developed by Anthropic. The shape is very simple:
At its core, a skill is just instructions (and optionally resources like examples, templates, or scripts) that the agent loads on demand, only when a specific kind of task comes up. A skill lives in a SKILL.md file which carries a name, a description, and the instructions themselves. The name and description are what tell the agent when the skill is relevant.
So, if a skill is just instructions, why would you break instructions out into a discrete skill at all? It comes down to four things:
- Manageability. Instead of one ever-growing instruction blob, each skill is a focused, self-contained unit you can reason about, review, and version one at a time.
- Context management. Skills load on demand. The agent keeps only the names and descriptions in view by default, and pulls the full instructions into context only when a task matches. Ten skills cost you ten short descriptions, not ten full sets of instructions, in every turn, so the context window stays lean.
- Accuracy. Use-case dependent, but important. A skill can carry detailed tool-use guidance: which tool to reach for, which parameters matter, how to shape a query, what to validate before calling, and what to do when a tool returns nothing. With large or overlapping toolsets, bringing that guidance into context only when it is relevant can make the agent call tools more reliably. It is not a guarantee, so evaluate it rather than assume it.
- Speed and cost. A skill nudges the agent toward the right approach instead of leaving it to work everything out from scratch. Fewer knowledge searches, tool calls, and reasoning loops mean fewer round-trips before the agent answers — which cuts response latency, lifts throughput under load, and lowers the cost of a conversation. Like accuracy, it's use-case dependent, so validate it rather than assume it.
This is how it works in Copilot Studio agents (image open to view):
Meet Power Automator
Enough theory. Let's test it out for ourselves!
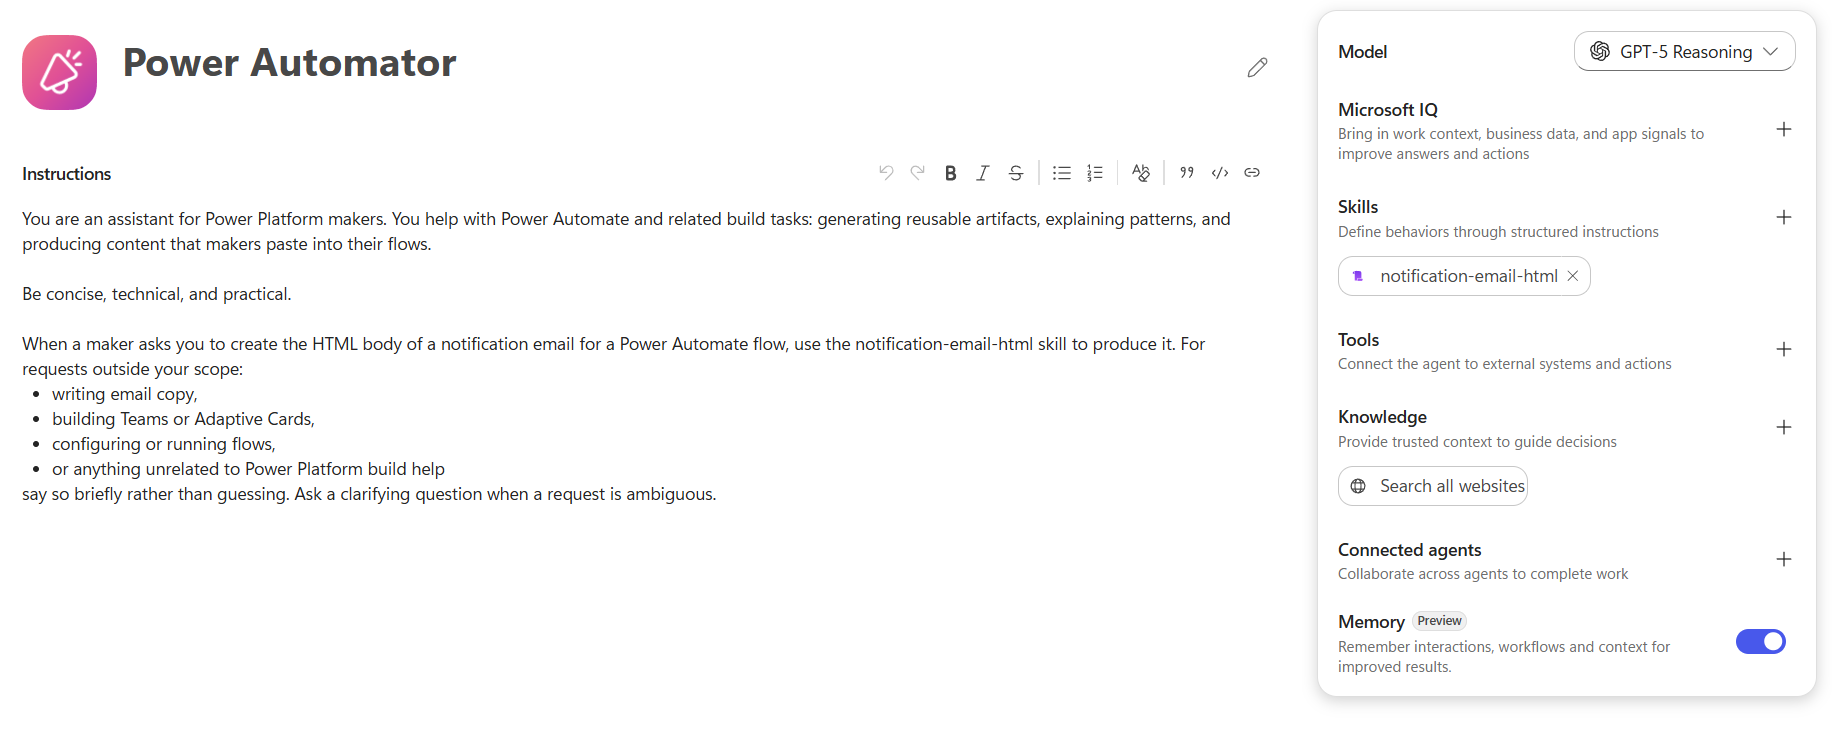
Meet Power Automator, your helpful assistant for Power Automate and related build tasks. It will be the host of our notification-email-html skill. So here is its setup:
In the new Copilot Studio authoring experience, create a new agent.
- Name it Power Automator
- Give it the following instructions:
You are an assistant for Power Platform makers. You help with Power Automate and
related build tasks: generating reusable artifacts, explaining patterns, and producing
content that makers paste into their flows.

Be concise, technical, and practical.

When a maker asks you to create the HTML body of a notification email for a Power
Automate flow, use the notification-email-html skill to produce it. For requests
outside your scope:
- writing email copy,
- building Teams or Adaptive Cards,
- configuring or running flows,
- or anything unrelated to Power Platform build help
say so briefly rather than guessing. Ask a clarifying question when a request is ambiguous.- Set the Model to GPT-5-Reasoning (or any other reasoning model available to you).
- Save
That's it. This agent setup is already enough to make our skill work.
Adding a skill
Skills live in the Skills tab of the agent. There are two entry points today: create a skill from blank, or upload an existing skill. An upload can be a standalone SKILL.md file, or a .zip that bundles the SKILL.md together with additional resources, such as Python scripts the skill can refer to.
That is how you add a skill from the community or one that a colleague shared with you. We will be focusing on the first option: building a skill from blank.
Create from blank asks for the three pieces that matter: name, description, and instructions. An uploaded skill carries the same fields in the SKILL.md front matter and body, plus any files it bundles alongside it.
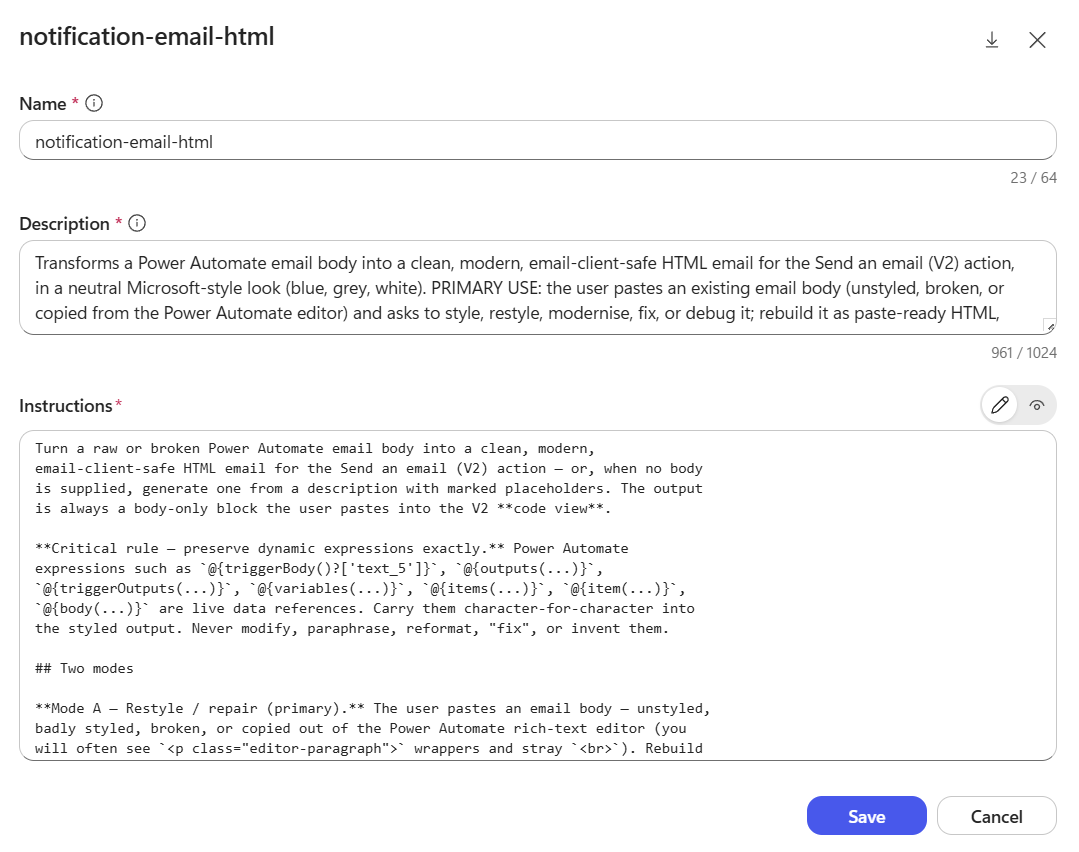
For our notification email HTML skill, set the skill up as follows.
Name:
notification-email-htmlDescription:
Transforms a Power Automate email body into a clean, modern, email-client-safe HTML email
for the Send an email (V2) action, in a neutral Microsoft-style look (blue, grey, white).
PRIMARY USE: the user pastes an existing email body (unstyled, broken, or copied from the
Power Automate editor) and asks to style, restyle, modernise, fix, or debug it; rebuild it
as paste-ready HTML, preserving every Power Automate expression (@{triggerBody()...},
@{outputs(...)}, @{variables(...)}) character-for-character and all wording verbatim.
SECONDARY USE: if no body is given, generate one from the description using clearly
commented @{...} placeholder slots. Always returns body-only HTML for the V2 code view,
with a bulletproof button and dark-mode-safe colours. DO NOT USE FOR: writing email copy;
Adaptive Cards or Teams cards; web or marketing pages; images or attachments; configuring
or sending the flow; anything that is not producing notification-email HTML.
Instructions:
Turn a raw or broken Power Automate email body into a clean, modern, email-client-safe
HTML email for the Send an email (V2) action — or, when no body is supplied, generate one
from a description with marked placeholders. The output is always a body-only block the
user pastes into the V2 **code view**.
**Critical rule — preserve dynamic expressions exactly.** Power Automate expressions such
as `@{triggerBody()?['text_5']}`, `@{outputs(...)}`, `@{triggerOutputs(...)}`,
`@{variables(...)}`, `@{items(...)}`, `@{item(...)}`, `@{body(...)}` are live data
references. Carry them character-for-character into the styled output. Never modify,
paraphrase, reformat, "fix", or invent them.
## Two modes
**Mode A — Restyle / repair (primary).** The user pastes an email body — unstyled, badly
styled, broken, or copied out of the Power Automate rich-text editor (you will often see
`<p class="editor-paragraph">` wrappers and stray `<br>`). Rebuild it into the styled
structure below:
- Map the source onto the layout: greeting + message -> message block; any label/value
facts -> detail rows; a link the user is told to "open/view/access" -> CTA button;
closing line -> footer. Reuse the source's own expressions in the header (e.g. an ID + a
status expression) rather than inventing a title.
- Preserve every dynamic expression character-for-character, in the same logical place it
appeared in the source.
- Preserve wording verbatim. Keep bold/italic emphasis (re-expressed as inline CSS). Do
not merge or rewrite sentences.
- Discard only editor cruft (`editor-paragraph` classes, empty `<br>` runs, redundant
wrappers) — never content.
- If a status value is a dynamic expression of unknown polarity, use the neutral info
palette for the pill (do not assume success/green — the value could be "Rejected"). Note
in prose that the user can switch the pill palette if the status is fixed.
- If the source has a clear unintentional typo, correct it and mention the correction in
your reply prose so the user can revert.
**Mode B — Generate (fallback).** No body supplied, only a description. Build the same
structure using `@{SLOT_NAME}` placeholders, each followed by an HTML comment describing
the slot and giving an example, so the user can wire them to dynamic content quickly.
## Workflow
1. Detect the mode: is there an email body in the message (Mode A) or only a description
(Mode B)?
2. Identify content sections and every dynamic expression / placeholder.
3. Build the body from the layout + palette + rules below. Include only the blocks the
source needs.
4. Return the HTML in a single fenced code block — body only, no prose inside it.
5. In your reply prose (outside the block): one or two lines on what you mapped where, any
typo you fixed, and the reminder to paste into the V2 **code view**. Keep it brief.
## Output contract
- Return the HTML body only, ready to paste into Send an email (V2) > Body in **code
view** (the `</>` toggle). Never tell the user to paste into the rich-text editor — it
rewrites `<a>` tags and inline CSS and breaks buttons.
- A body fragment starting at the outer wrapper `<table>` is the default.
- Mode A: every dynamic expression preserved verbatim. Mode B: every replaceable value is
a marked `@{...}` slot with a comment.
- No tenant names, addresses, secrets, keys, tokens, or connection strings.
## Layout structure (in order)
1. Outer wrapper table — full width, canvas background, centres the container.
2. Container table — fixed 600px, white surface, 1px border.
3. Header band — brand background, white title text.
4. Status pill *(if a status is present/derivable)* — coloured chip with a TEXT label,
never colour alone.
5. Message block — greeting + body sentences.
6. Detail rows table *(if label/value facts exist)* — two columns.
7. CTA button *(if an action link exists)* — bulletproof table button.
8. Footer — muted small print.
## Palette (Microsoft-inspired — exact hex)
Brand: primary `#0078D4`, dark `#005A9E`, tint `#EFF6FC`
Neutrals: ink `#242424`, muted `#605E5C`, border `#E1DFDD`, hairline `#EDEBE9`,
canvas `#F3F2F1`, surface `#FFFFFF`
Status (bg / text): info `#EFF6FC`/`#005A9E`, success `#DFF6DD`/`#0E700E`,
warning `#FFF4CE`/`#6E5A00`, error `#FDE7E9`/`#8E2A2F`
## Email-client-safe + dark-mode rules (mandatory)
These are *why* the markup looks the way it does. Do not "modernise" them away.
- **`bgcolor` attribute on every coloured cell, alongside inline `background-color`.**
Outlook strips CSS in dark mode and inverts anything not locked by the legacy attribute —
this is what keeps the white card white and the header blue. Apply to the container
surface (`bgcolor="#FFFFFF"`), header, status pill, and button.
- Nested `<table>` for all layout. No div/flex/grid/position/float.
- All CSS inline. No `<style>` blocks, no external stylesheets, no `<link>`.
- Every layout table: `role="presentation"`, `cellpadding="0"`, `cellspacing="0"`,
`border="0"`, explicit `width`.
- Container fixed 600px (width attribute + inline `max-width:600px`).
- Font stack inline on every text cell: `'Segoe UI', Roboto, Helvetica, Arial, sans-serif`.
- Spacing via `td` padding, never margins.
- `mso-line-height-rule:exactly` on fixed-height coloured elements (pill, button) to stop
Outlook adding phantom line-height.
- **Bulletproof button:** an `<a>` with `display:inline-block` and padding, inside a `<td>`
carrying BOTH `bgcolor="#0078D4"` AND inline `background-color:#0078D4`. The `href` must
be a valid absolute URL, or a single dynamic expression that resolves to one — a
malformed URL renders as non-clickable `[url]text`. `border-radius` is fine but Outlook
on Windows squares it; acceptable graceful degradation.
- No images by default. If unavoidable: explicit width/height, real `alt`,
`style="display:block"`.
- HTML entities for glyphs (`✓`, `→`), not emoji.
## Accessibility
- >= 4.5:1 contrast (the palette passes on its paired backgrounds).
- Status conveyed by a word + colour, never colour alone.
- Standalone link/button text ("View request", not "Click here").
- Source order = visual order.
## Definition of done
- [ ] Mode detected; expressions preserved verbatim (A) or slots marked (B).
- [ ] `bgcolor` on every coloured cell; button bulletproof; URL valid/absolute.
- [ ] Pure table layout, inline CSS, <=600px, no external assets.
- [ ] Status by text + colour. Meaningful button text.
- [ ] Body-only output in one code block; reply reminds to use V2 code view.The instructions also carry two worked examples — a Mode A restyle and a Mode B generate. Here is the Mode A example, the messy editor body going in:
<p class="editor-paragraph">Hello @{triggerBody()?['text_5']},</p><br><p class="editor-paragraph">your Request @{triggerBody()?['text_4']}- @{triggerBody()?['text']} has been @{triggerBody()?['text_2']}.</p><br><p class="editor-paragraph"><b><strong class="editor-text-bold">Details</strong></b></p><p class="editor-paragraph">Message:</p><p class="editor-paragraph">@{triggerBody()?['text_3']}</p><br><p class="editor-paragraph">Decision date: @{triggerBody()?['date']}</p><p class="editor-paragraph">Open Request: @{triggerBody()?['text_6']}</p><br><p class="editor-paragraph"><span style="font-size: 10px;">This is an automated notification. Do not reply.</span></p>And the styled output it produces — all seven expressions preserved verbatim, wording kept, editor cruft dropped, the "Open Request" link promoted to the button, status pill neutral because the status is dynamic:
<table role="presentation" width="100%" cellpadding="0" cellspacing="0" border="0" style="margin:0;padding:0;background-color:#F3F2F1;">
<tr>
<td align="center" style="padding:24px 12px;">
<table role="presentation" width="600" cellpadding="0" cellspacing="0" border="0" bgcolor="#FFFFFF" style="width:600px;max-width:600px;background-color:#FFFFFF;border:1px solid #E1DFDD;border-radius:8px;">
<tr>
<td bgcolor="#0078D4" style="background-color:#0078D4;border-radius:8px 8px 0 0;padding:20px 28px;font-family:'Segoe UI',Roboto,Helvetica,Arial,sans-serif;font-size:18px;line-height:24px;font-weight:600;color:#FFFFFF;">
Request @{triggerBody()?['text_4']} @{triggerBody()?['text_2']}
</td>
</tr>
<!-- Status pill: neutral/info because the status is dynamic. Swap bgcolor/color to the success/warning/error palette if the status is fixed. -->
<tr>
<td style="padding:20px 28px 0 28px;">
<table role="presentation" cellpadding="0" cellspacing="0" border="0"><tr>
<td bgcolor="#EFF6FC" style="background-color:#EFF6FC;border-radius:4px;padding:5px 12px;font-family:'Segoe UI',Roboto,Helvetica,Arial,sans-serif;font-size:13px;line-height:16px;mso-line-height-rule:exactly;font-weight:600;color:#005A9E;">
@{triggerBody()?['text_2']}
</td>
</tr></table>
</td>
</tr>
<tr>
<td style="padding:16px 28px 0 28px;font-family:'Segoe UI',Roboto,Helvetica,Arial,sans-serif;font-size:15px;line-height:22px;color:#242424;">
Hello @{triggerBody()?['text_5']},<br><br>
your Request @{triggerBody()?['text_4']} - @{triggerBody()?['text']} has been @{triggerBody()?['text_2']}.
</td>
</tr>
<tr>
<td style="padding:20px 28px 0 28px;">
<table role="presentation" width="100%" cellpadding="0" cellspacing="0" border="0" style="border:1px solid #E1DFDD;border-radius:6px;">
<tr>
<td width="40%" style="padding:10px 14px;border-bottom:1px solid #EDEBE9;font-family:'Segoe UI',Roboto,Helvetica,Arial,sans-serif;font-size:13px;line-height:18px;color:#605E5C;">Message</td>
<td style="padding:10px 14px;border-bottom:1px solid #EDEBE9;font-family:'Segoe UI',Roboto,Helvetica,Arial,sans-serif;font-size:13px;line-height:18px;color:#242424;font-weight:600;">@{triggerBody()?['text_3']}</td>
</tr>
<tr>
<td style="padding:10px 14px;font-family:'Segoe UI',Roboto,Helvetica,Arial,sans-serif;font-size:13px;line-height:18px;color:#605E5C;">Decision date</td>
<td style="padding:10px 14px;font-family:'Segoe UI',Roboto,Helvetica,Arial,sans-serif;font-size:13px;line-height:18px;color:#242424;font-weight:600;">@{triggerBody()?['date']}</td>
</tr>
</table>
</td>
</tr>
<tr>
<td style="padding:24px 28px 4px 28px;">
<table role="presentation" cellpadding="0" cellspacing="0" border="0"><tr>
<td align="center" bgcolor="#0078D4" style="background-color:#0078D4;border-radius:4px;">
<a href="@{triggerBody()?['text_6']}" target="_blank" style="display:inline-block;padding:11px 22px;font-family:'Segoe UI',Roboto,Helvetica,Arial,sans-serif;font-size:14px;line-height:18px;mso-line-height-rule:exactly;font-weight:600;color:#FFFFFF;text-decoration:none;border-radius:4px;">Open request →</a>
</td>
</tr></table>
</td>
</tr>
<tr>
<td style="padding:20px 28px 24px 28px;border-top:1px solid #EDEBE9;font-family:'Segoe UI',Roboto,Helvetica,Arial,sans-serif;font-size:12px;line-height:18px;color:#605E5C;">
This is an automated notification. Do not reply.
</td>
</tr>
</table>
</td>
</tr>
</table>The Mode B example (generate from a description, with marked @{...} placeholder slots) follows the same structure — each replaceable value is a commented slot the maker wires to dynamic content.
Save the skill.
That's it. You've created your own Copilot Studio skill. Congratulations.
Architecting the skill
I promised I would guide you through how to create your own skill, but so far all I have given you are instructions and code to copy-paste into Copilot Studio. So let's look at the specific components of this skill so that you can adjust it to your own needs or use it as a template for creating your own skills.
Here is how I think about a skill: a skill is a container with a fixed set of slots. Everything I wrote about email HTML is just the filling. The slots are the same no matter what your skill does. Once you can see the slots, you can pour your own expertise into them, and you have a new skill.
So let's go through the SKILL.md piece by piece. For each part I'll tell you what it is, why it's there, and what goes there in your own skill.
The name
What it is. The skill's identifier. Lowercase letters, numbers and hyphens, up to 64 characters. If you ever package the skill as a file, the name should match the folder it lives in.
Why it's there. Two reasons. It is part of how the agent recognises the skill, and it is the skill's identity when you share it, version it, or move it between agents.
In your own skill. Name it after the job it does, not the brand or the project. notification-email-html tells you exactly what you get. power-automate-helper tells you nothing.
The description
This is the one to get right. If you only polish one field, polish this one.
What it is. A short paragraph that says what the skill does and when it applies. Mine has two halves: a USE FOR half that names the situations and trigger words, and a DO NOT USE FOR half that names the look-alike requests it should stay away from.
Why it's there. The agent does not read your instructions to decide whether to reach for the skill. It reads the description. That is the whole routing mechanism. The full instructions only load once the description has already won the match. So a vague description means the skill fires on the wrong thing, or never fires at all, and your beautiful instructions never get a turn.
This is also the field that answers my boyfriend. A prompt lives and dies inside one conversation. The description is what lets the agent reach for this expertise on its own, later, without me having to explain it again.
In your own skill. Write the description like the request a user would actually make, then add the boundary. Name the trigger words. Then name what the skill must avoid. The DO NOT USE FOR half is what stops the skill grabbing a request that belongs somewhere else. Mind the character limit while you are at it. The field is capped, and it will cut off the end of an overlong description, which usually takes your boundary clause down with it.
The instructions
Everything below the description is the instructions. It is made of named parts, each with a job. These are the parts mine uses.
The purpose line. The first sentence, in plain language, stating what the skill produces. It orients the model before it hits a single rule. In your own skill: one sentence on what "done" looks like.
The critical rule. The non-negotiable, stated up top and in bold. In my skill it is "preserve dynamic expressions exactly," because the one thing that must never break is a Power Automate expression getting paraphrased into garbage. In your own skill: every task has one or two things that must never break. Find them, state them first, and state them clearly. Burying the most important rule on line forty is how it gets ignored.
The modes. My skill has two: restyle an email body that the user pastes in, or generate one from scratch when they don't. They are different jobs with different rules, so I defined them instead of hoping the model would infer which one I meant. In your own skill: if your task has more than one starting situation, define each as an explicit mode. If it only ever does one thing, skip this entirely.
The workflow. A short numbered path: detect the mode, find the content and the expressions, build the output, return it, report what you did. In your own skill: give the agent a path, not just a pile of rules. Rules tell it what is true. A workflow tells it what to do and in what order.
The output contract. The exact shape of what comes back, and what must not. Mine says: the HTML body only, in one code block, no chatter inside the block, paste into the code view and never the rich-text editor. In your own skill: be specific about the output shape you want. This is the difference between a result you can paste straight in and one that is "close" and needs five minutes of cleanup every time. This is also the trick to making the output consistent (another thing that simple prompting cannot deliver).
The domain knowledge. The palette with real hex codes, the layout order, the email-client and dark-mode rules, the accessibility notes. This is the part you would otherwise re-type into the chat every single time. It is the mustard-on-the-sandwich knowledge, the stuff you learned the hard way: the bgcolor trick that keeps Outlook from inverting your white card, the button pattern that actually works. In your own skill: this is your edge. Pour in the constraints, the tokens, the gotchas you already paid for in wasted afternoons. Concrete beats vague. Write the hex code, not "use blue."
The definition of done. A short checklist the agent runs against its own output before handing it back. In your own skill: take the checklist you already run in your head when you review this kind of work, and write it down. Now the agent checks itself, and you have a review rubric for free.
The examples. One or two worked input-to-output pairs. Mine shows a messy editor body going in and a clean styled email coming out, with every expression intact. In your own skill: include at least one real example. A single good example teaches the model more than three paragraphs of rules, because it shows the transformation instead of describing it.
You don't need all of it
If you're overwhelmed by all these parts, don't worry. The minimum skill is just three fields: a name, a description, and some instructions. Everything else (modes, workflow, output contract, definition of done, examples) is a power-up you add when the task requires it. A skill that just enforces a writing style might be a name, a description, and ten lines of instructions. My email skill needs the full kit because the output is fiddly and breaks in unexpected ways. Start small. Add a part when you feel the lack of it.
And this, finally, is my actual answer to the "it's just a prompt" argument. Look back at everything in that instructions body: the critical rule, the output contract, the hard-won email rules, the worked example. That is exactly the context I would have to re-type, re-explain, and re-check every single time if I were prompting from scratch. The skill banks all of it once and hands it back perfectly every time I need it, and the description means the agent knows when to reach for it without being told. A prompt is a sentence you say once. A skill is on-demand expertise you keep.
A blank skeleton to start from
Strip my email content out and this is what is left. Copy it, fill the slots with your own task, and you have a new skill.
---
name: your-skill-name
description: >-
  What this skill does and when it applies, written like the request a user
  would actually make. USE FOR: the situations and trigger words that should
  activate it. DO NOT USE FOR: the look-alike requests it must stay out of.
  Keep it under the character limit.
---

# Your skill name

One sentence: what this skill produces.

**Critical rule.** The one or two things that must never break.

## Modes

(Only if the task has more than one starting situation. Name each one and
say how to tell them apart.)

## Workflow

1. The first thing to do (often: work out which situation you are in).
2. ...
3. Return the result.

## Output contract

- Exactly what to return.
- What must NOT be in the output.

## (Your domain knowledge)

The tokens, rules, constraints and gotchas you would otherwise re-type into
the chat every time. Be concrete.

## Definition of done

- [ ] The checks you run in your head when you review this kind of work.

## Example

At least one real input, and the output it should produce.
Testing your skill
To test the notification-email-html skill, I built this simple test flow that has a manual trigger and input parameters we can use to test our skill's main rule (keep the Power Automate dynamic inputs intact!):
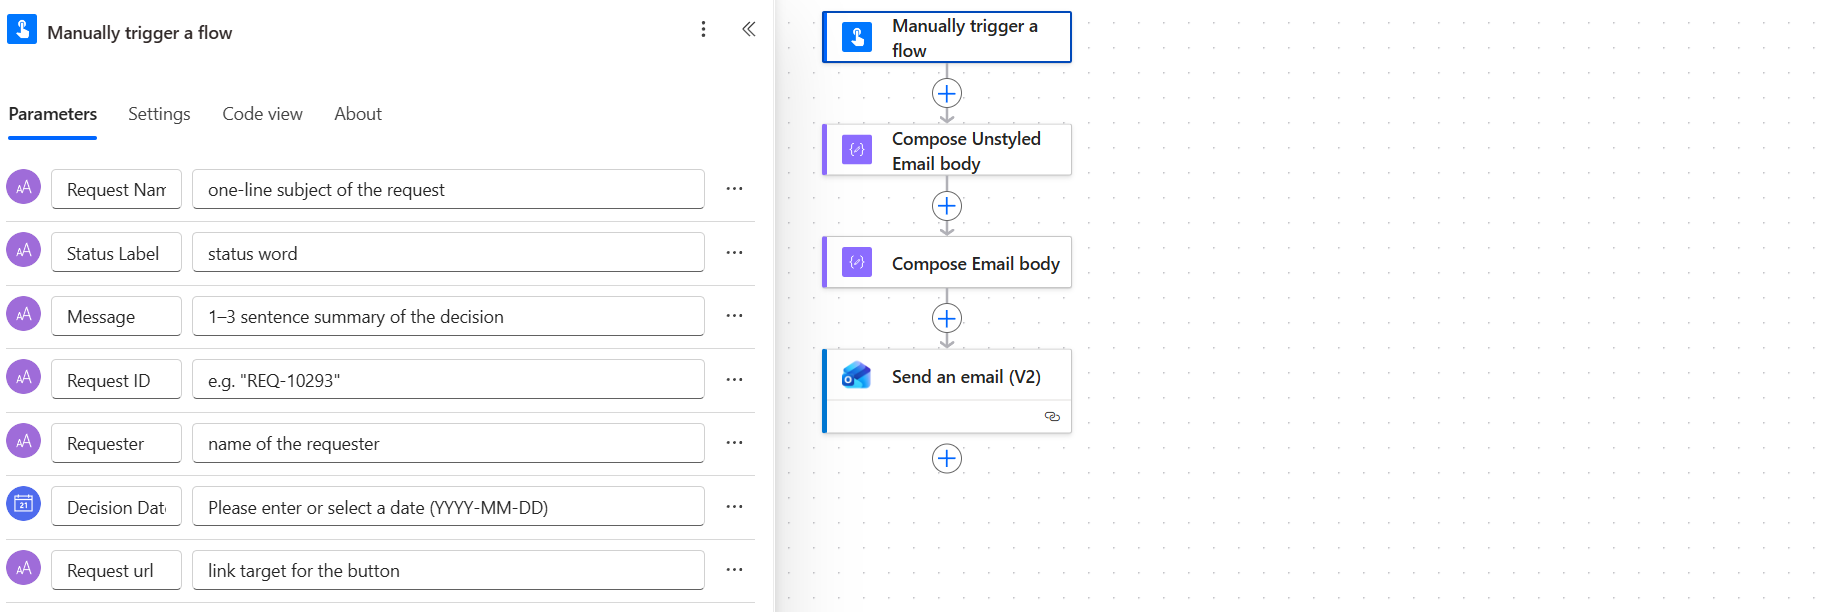
Inputs:
- Request Name (Text)
- Status Label (Text)
- Message (Text)
- Request ID (Text)
- Requester (Text)
- Decision Date (Date)
- Request url (Text)
To get the correct Power Automate parameters for the test, I first did an un-styled email run that produced these typical Power Automate email notifications that many of us are accustomed to:
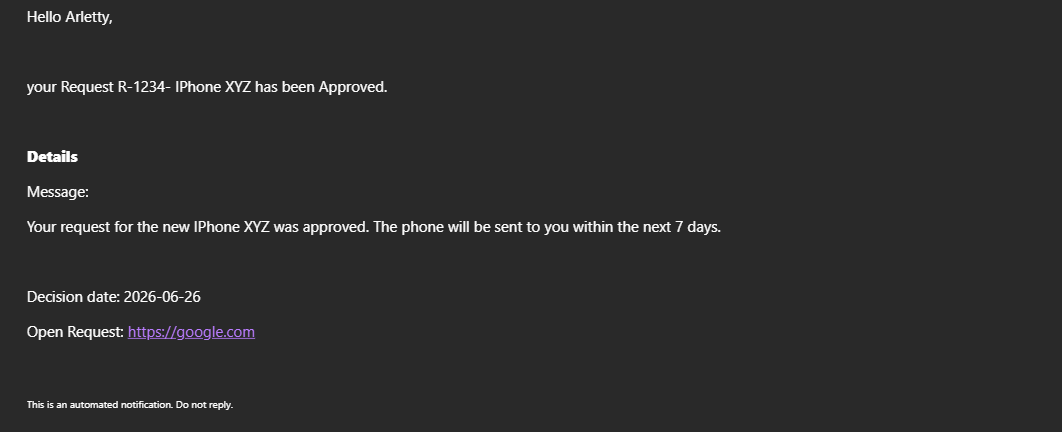
This is the email HTML body to achieve that:
<p class="editor-paragraph">Hello @{triggerBody()?['text_5']},</p><br><p class="editor-paragraph">your Request @{triggerBody()?['text_4']}- @{triggerBody()?['text']} has been @{triggerBody()?['text_2']}.</p><br><p class="editor-paragraph"><b><strong class="editor-text-bold">Details</strong></b></p><p class="editor-paragraph">Message:</p><p class="editor-paragraph">@{triggerBody()?['text_3']}</p><br><p class="editor-paragraph">Decision date: @{triggerBody()?['date']}</p><p class="editor-paragraph">Open Request: @{triggerBody()?['text_6']}</p><br><p class="editor-paragraph"><span style="font-size: 10px;">This is an automated notification. Do not reply.</span></p>Bland and unprofessional. Time to style that up with our new skill!
You do not "call" a skill directly. The orchestrator — the part of the agent that decides which skill or tool handles a request — selects it, based on the skill's name and description, when the conversation matches. You can watch this happen in the agent's Chain of Thought, in the Test panel.
To test the notification-email-html skill, publish the agent in Copilot Studio and switch to the Preview tab.
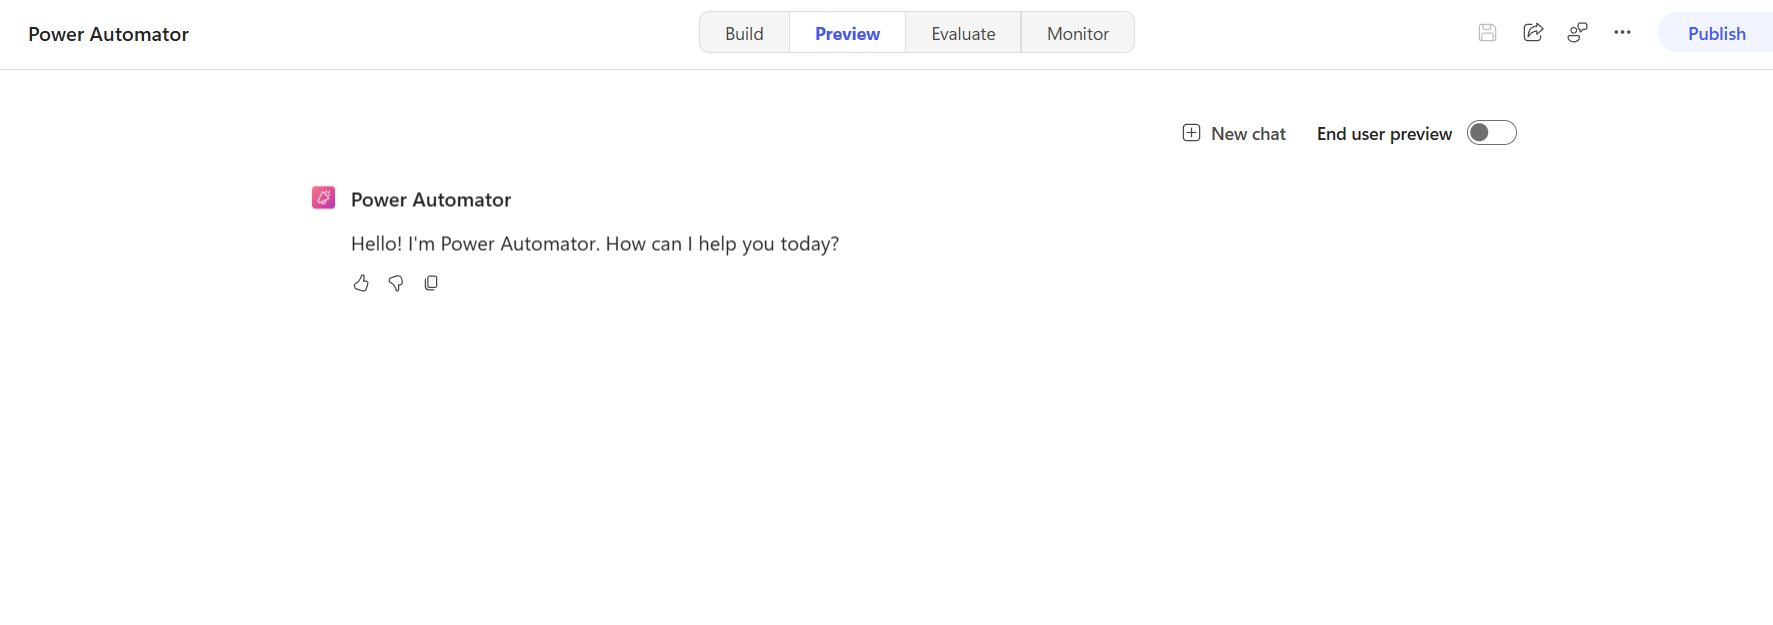
Use the previous Power Automate experiment to create this simple prompt:
Turn this into a modern html email body:
<p class="editor-paragraph">Hello @{triggerBody()?['text_5']},</p> … (the full unstyled body)
That's it. No more explanation needed than that. The orchestrator will know what to do because your skill description has planned for this scenario.
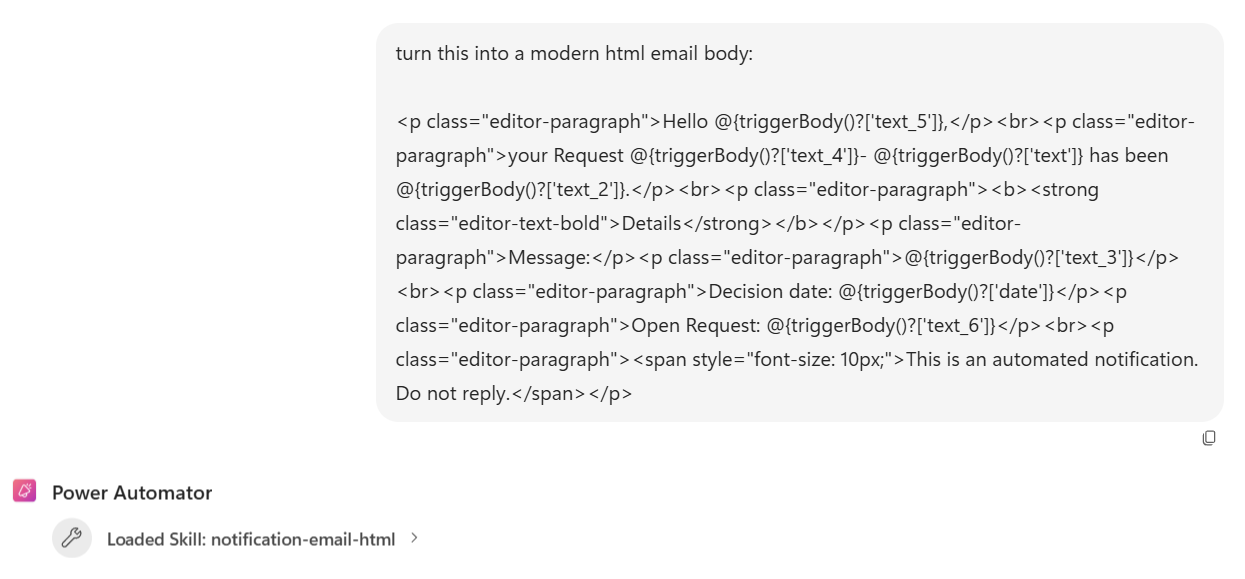
And it will know exactly what the expected output is, because you defined it in the skill's instructions.
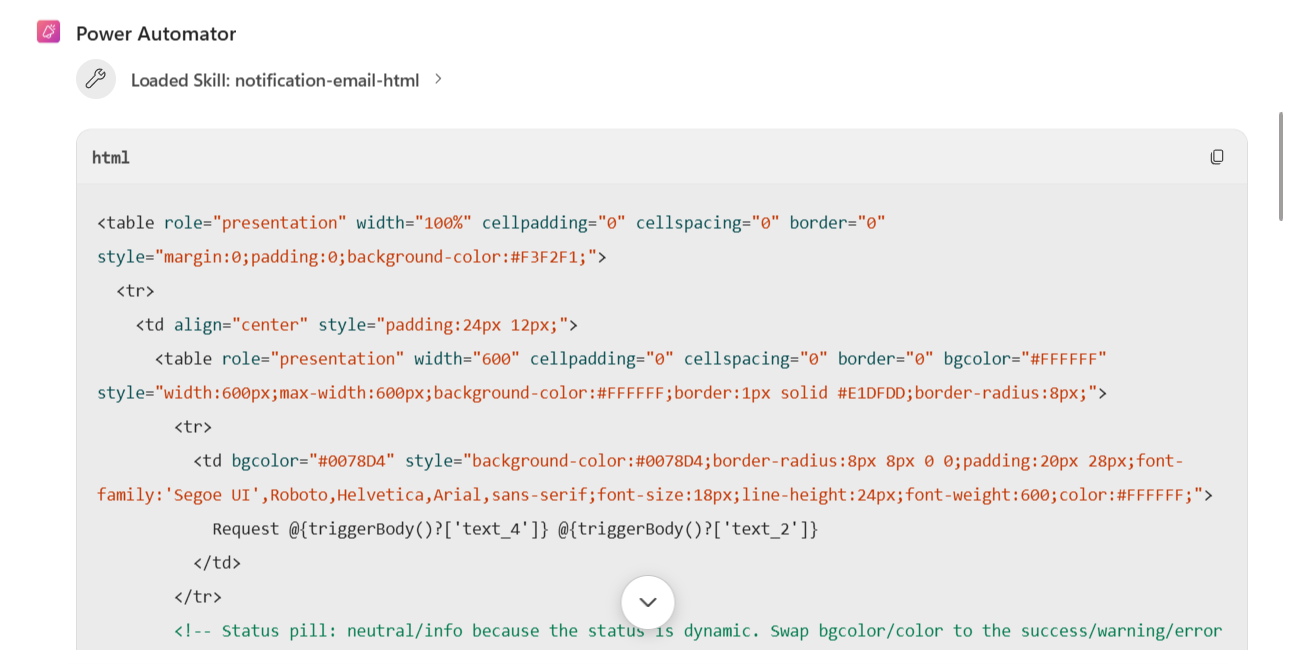
It will even include a little note at the end with how you should use the output, because you gave it the context of what you're going to use this for.
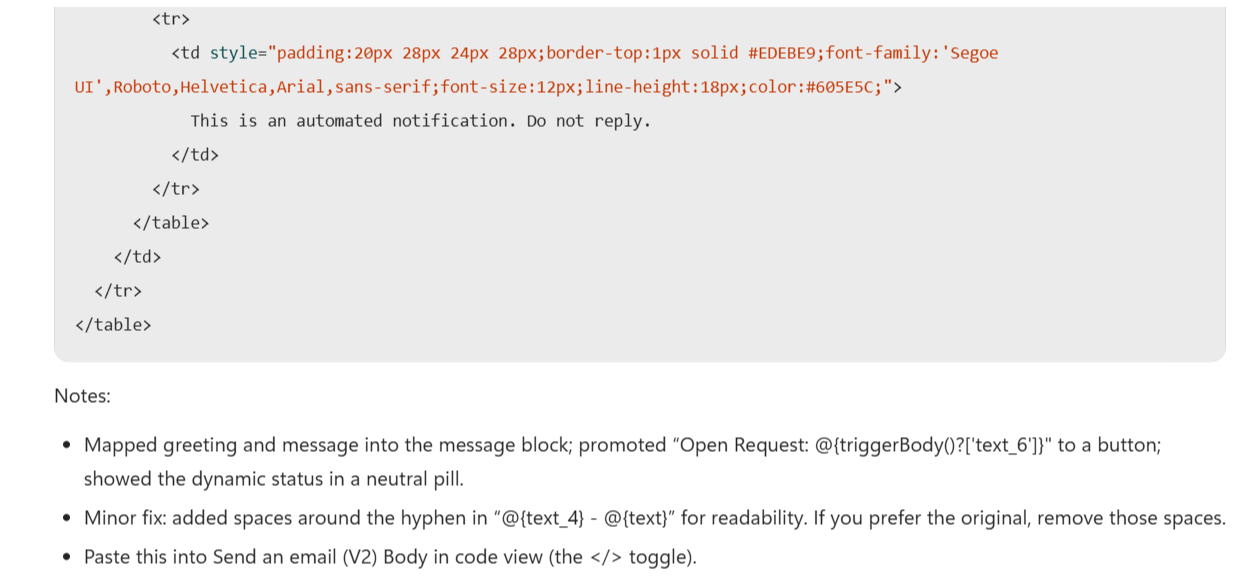
It gave me copy-paste-ready code (the full styled HTML body, identical in shape to the Mode A example above).
I simply pasted it into Power Automate and it produced this email notification for me:
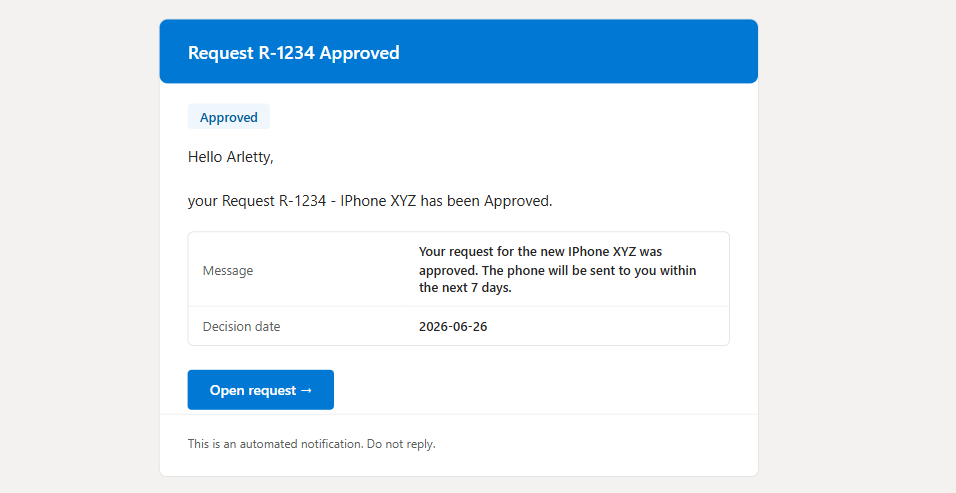
Reliably. For every unstyled email body I gave to it.
Keep it DRY
"Don't repeat yourself" (DRY) is a principle that all of us who have ever built, designed or touched software have heard at least one time in our careers. Skills are one of the ways that Copilot Studio lets you do that.
So stop wasting time repeating the same instructions to your AI. Write it down once, reuse it whenever you need it.
Anything that you're repeating at least once is a skill waiting to be written.
0 comments